Introduction to a Filter Effect
Manipulating Images in Photoshop Elements


Each of you will be manipulating images in a variety of fashions through the tools found in the Adobe® Photoshop® Elements 2.0 Liquify gallery -- you can twist portions of an image, reflect an image, and add a variety of interesting and unique effects. This tutorial shows you how to use the Liquify Gallery.
Open Dreamweaver (for putting saved images on your worklinks)
Open Photoshop Elements and do each of the bolded activities -
- Create a warp effect.
- Create a twist effect.
- Form instant reflections.
- Make logos that sizzle.
- Turn shapes into patterns.
- Go from geometry to fluidity.
- Change an expression.
- Add a surrealistic touch.
This assignment has 8 saved images!!!!!
1. Create a warp effect.
In this example, the warp tool and the twirl tools were used to make the model's hair look fuller and wavier. To create a similar look for someone's hair in one of your photos, choose Filter > Distort > Liquify.
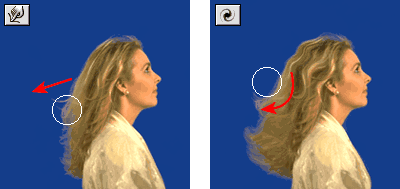
In the Liquify dialog, select the warp tool and select a brush size. With
the warp tool positioned as shown in the example, slowly drag to the left.
Repeat until the hair has the desired volume. Next, select the twirl tool,
adjust the brush size if necessary, and slowly drag to the left until
the desired twirl effect is achieved.
If you are not satisfied with the results, click Revert to return the image to its original appearance, and continue working.
- Now, open your image of you
- Manipulate it using the the tools show above in Warp Effect
- File>Save for Web>OK>save as warp
Create a twist effect.
You can create a different look by using the twirl tool on any portion of an image. To distort a pattern similar to this example, or any pattern or photo, choose Filter > Distort > Liquify.
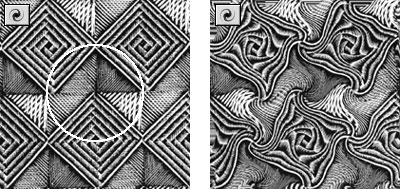
Select the twirl tool, either the clockwise twirl or the counter clockwise twirl, and select a brush size. Place the twirl tool in the area of the image you want to distort and hold the mouse button until you are pleased with the results.
- Now, open a patterned image (remember to save it to your student directory)
- Manipulate it using the the tools show above in Twist Effect
- File>Save for Web>OK>save as twist
Form instant reflections.
To create a reflection of an image, choose Filter > Distort > Liquify.
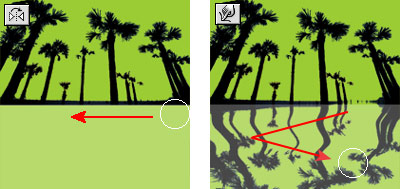
To create a reflection similar to this example, select the reflection tool and move it from right to left just below your image. As you continue moving down with the reflection tool going from right to left, a reflected image is formed.
Once the reflection is complete, select the warp tool and set the strength to desired intensity. Moving the tool back and forth over the reflection creates a wavy effect, simulating waves in water.
- Now, open an image that you would like to use - it is best if there is some room below the image - (remember to save it to your student directory - rt click>save picture as)
- Manipulate it using the the tools show above in Reflection Effect
- File>Save for Web>OK>save as reflection
Make logos that sizzle.
You can add special effects to text you have entered on a simplified layer.

Open a new document (300 by 300 pixels). Next, create a new layer (layer>new) and enter
any text you like. Choose a font and font size and a color if you like.
Simplify the layer before applying a Liquify effect, with the new layer
selected, choose Layer > Simplify Layer.
With the new layer still selected, choose Filter > Distort > Liquify. In the dialog box, select the warp tool. Using a brush size that is about the width of the letters, drag small portions of the tops little by little until you are satisfied with the results.
- Now, create a text layer (the T tool)
- Manipulate it using the the tools show above in Sizzle Effect
- File>Save for Web>OK>save as sizzle
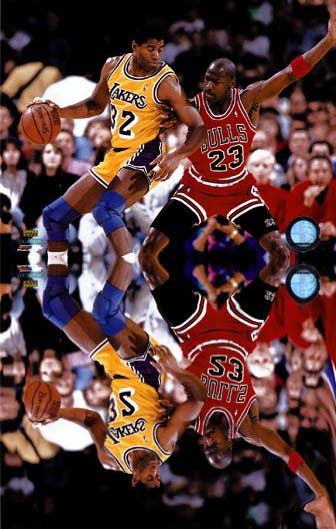
Turn shapes into patterns.
You can turn a single shape into a pattern of repeating shapes, similar to this example of the moth pattern.
To turn shapes into patterns, choose Filter > Distort > Liquify.
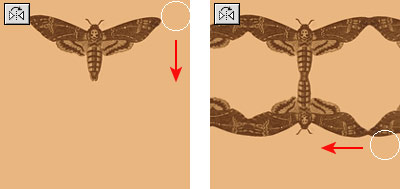
Select the reflection tool. Place the tool to the right of your pattern and move it down to create a second pattern. Then move the reflection tool to the left of your pattern to create a third. Once you have three patterns in a row, move the reflection tool below them from right to left to create a reflected image.
- Now, open a shape that you would like to use (remember to save it to your student directory)
- Manipulate it using the the tools show above in Shape_Pattern Effect
- File>Save for Web>OK>save as shape_pattern
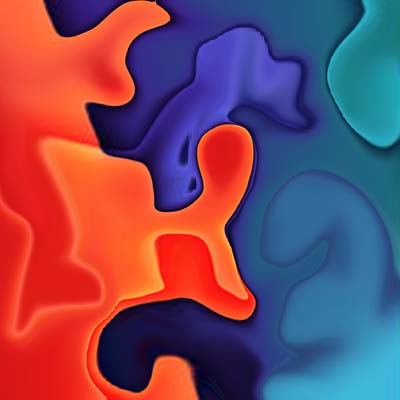
Go from geometry to fluidity.
To get shapes flowing, you can experiment with the warp tool to mix colors and undulate shapes.
Using any geometric pattern, choose Filter > Distort > Liquify.
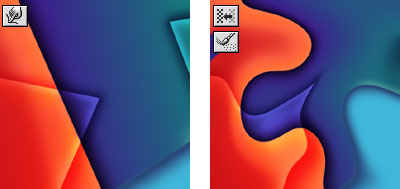
In the dialog, use the warp tool to mix the colors and shapes. Then use both the shift pixels tool and the reconstruct tool to further enhance the fluid look.
- Now, open a pattern that you would like to use (remember to save it to your student directory)
- Manipulate it using the the tools show above in Geomety_Fluid Effect
- File>Save for Web>OK>save as geometry_fluid
Change an expression.
Turn a frown into a smile, and change other facial features. In this example, the monster takes on a more threatening expression through the use of the bloat and pucker tools. To make changes to an expression similar to the monster's, choose Filter > Distort > Liquify.
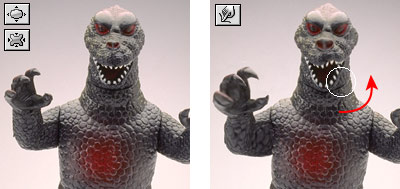
Hold the bloat tool over the claw to make the claws larger. Then hold the bloat tool over the nostrils to make them flare. Alternate between the bloat and pucker tools to achieve the desired effect. Apply the warp tool to the upper right corner of the mouth to create a snarl.
- Now, open an image that you would like to use (remember to save it to your student directory)
- Manipulate it using the the tools show above in Bloat Effect
- File>Save for Web>OK>save as bloat
Add a surrealistic touch.
To add a surrealistic touch to an image, similar to the clock in this example, choose Filter > Distort > Liquify.
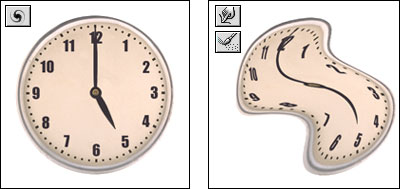
Use the twirl counterclockwise tool to slightly twist the clock face. Then use the warp tool to mold the clock into the general shape you want. Apply the reconstruct tool to the edges of the clock to add the finishing touches.
- Now, open a clock that you would like to use (remember to save it to your student directory)
- Manipulate it using the the tools show above in Surreal Effect
- File>Save for Web>OK>save
as surreal
Your Assignment
- Do each of the bolded activities
in Photoshop Elements - save them each individually (save for web) Remember
to save them into your student directory in your graphics folder (week4)
- Create a warp effect.
- Create a twist effect.
- Form instant reflections.
- Make logos that sizzle.
- Turn shapes into patterns.
- Go from geometry to fluidity.
- Change an expression.
- Add a surrealistic touch.
- Place these on your Dailylog and Worklinks - if you are real sharp - place them into a dreamweaver document! - Show me what you got!