

Portfolio: Building the Shell
Inserting the Page Wrapper
In Dreamweaver, Open index.html in your portfolio folder.
Inserting <div> Tags
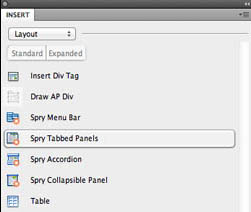
- Make sure you have the Insert panel open. If not, click window > insert
- Change the insert menu options from "Common" to "Layout" by selecting the layout option from the dropdown menu
- Before we begin inserting <div> tags, it's important to devise a strategy for creating a layout. While it's not impossible to add additional <div> tags after you create a page layout, it's not exactly efficient and you may encounter issues that would take up more of your time if you would've just planned ahead. For this example, we will build a one-column layout.
- A common layout method is to "contain" all the components in a layout inside one large <div> tag. Below is the list of <div> tags we will create in order – it's important to go in order from top to bottom when inserting <div> tags so the layout turns out right. Also note the names of each tag.
- wrapper/container
- header
- navbar
- content
- footer – the footer will go below the wrapper
Wrapper
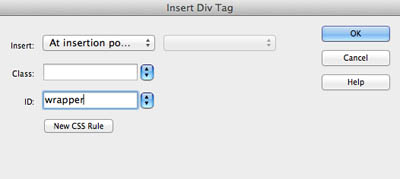
- Click the Insert Div Tag button
- Note the options in the dialogue box
- The top drop down menu contains options for where to insert the div tag. The two main options we will use are "at insertion point" and "after tag."
- Next, is a box to enter a class name. We won't be using class to create the styling for <div> tags
- The third box is to enter an ID name. We will be using this box to create an ID for each of our <div> tags
- Last, is a "New CSS Rule" button. This is a nice, convenient feature that will allow us to create an ID then apply styling to that ID which will be applied to the <div> tags we create
- Leave the insert point as "at insertion point" – there are no <div> tags on the page as of yet, so we simply insert it where it's at
- Type "wrapper" in the ID box
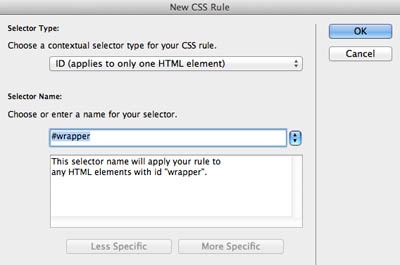
- Click the New CSS Rule button
- A New CSS Rule dialogue box appears
- Click OK
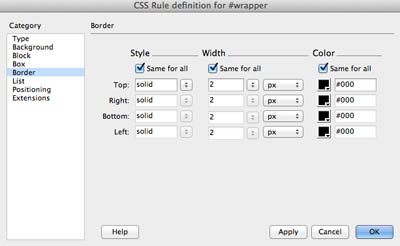
- The CSS Rule Definition for #wrapper dialogue box opens
- Take a quick note of the category column in the left-hand side. These are all the properties we can style for <div> tags
- Select the Box property in the Category column
- Type 900 in the width box and leave the unit at "px" for pixels in the right drop-down menu
- In the Margins section, UNCHECK the "Same for all" box
- In the Right and Left boxes, select auto from the drop down menu to the right of the box
- The reason we set the left and right margin values to auto is so our layout is centered in the screen. By setting the each value to auto, we are centering the box within whatever it is contained – in this case, the screen of a computer.
- Next, select the Border property in the Category column
- We're going to put a border all the way around the wrapper <div>, so leave the "Same for All" checked
- Select solid from the "Style" drop down menu
- Type 2 in the "width" box and leave "px" (pixels) for the unit
- Click the "color picker" box and select the black swatch
- Click OK
- The Insert Div Tag dialogue box re-appears
- Click OK again
- In the index.html document, you should see a rectangular box with the text "Content for id "wrapper" goes here"

- With the text still highlighted, delete the text
- Important – make sure the cursor is still inside the wrapper <div> after you delete the text

Next Steps
In the next exercise, you will continue building the layout for your portfolio.
Click here for the next tutorial
