

Portfolio: Building the Shell
Inserting the Navbar
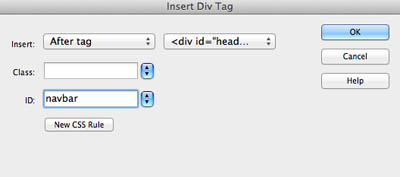
- Click the Insert Div Tag button
- Change the insert point to "after tag," and select <div id="header"> in the drop down menu to the right
- If you don't see these options, make sure your cursor is inside the header <div>
- Type "navbar" in the ID box
- Click the New CSS Rule button
- A new CSS Rule dialogue box appears
- Click OK
- The CSS Rule Definition for #navbar dialogue box opens
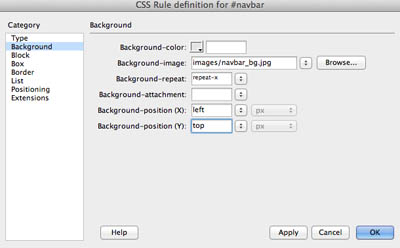
- Select the Background property in the Category column
- I've provided a background image for you. Note the size of this image: it's 5px x 25px; however, our navbar will be 900px by 25px. Dreamweaver, by default, repeats a background image until it fills up the space it's designated for. A nice feature we will take advantage of by repeating our image on the x-axis. This will reduce our image file size significantly. You'll change this later after you've designed your own.
- Click the browse button
- Navigate to the images folder inside the "lastname_firstname_portfolio" folder
- Select "navbar_bg.jpg"
- In the Background-repeat drop down menu, select "repeat-x"
- In the Background-position (x) drop down menu, select "left"
- In the Background-position (y) drop down menu, select "top"
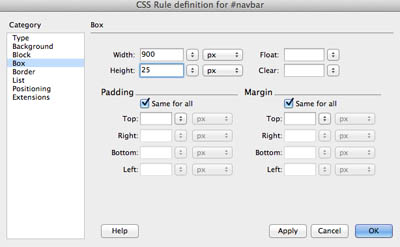
- Next, select the Box property in the category column
- Type 900 in the width box and leave the unit at "px" (pixels)
- Type 25 in the height box and leave the unit at "px" (pixels)
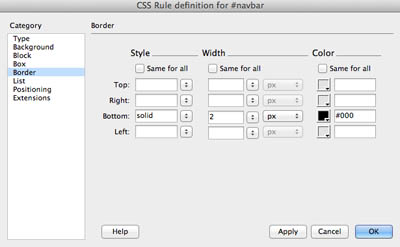
- Select the border property in the category column
- We're only going to use a border on the bottom, so UNCHECK the "Same for all" box
- For the bottom border, Select solid from the "Style" drop down menu
- Type 2 in the "width" box and leave "px" (pixels) for the unit
- Click the "color picker" box and select the black swatch
- Click OK
- The Insert Div Tag dialogue box re-appears
- Click OK again
- In the index.html document, you should see the banner image followed by the navbar with the text "Content for id "navbar" goes here"
- Delete the text from the navbar

Note: we will be inserting and styling the actual navigation menue in a later exercise
Next Steps
In the next exercise, you will continue building the layout for your portfolio.
Click here for the next tutorial
