

Portfolio: Inserting and Styling Content
Inserting the Content for the Resume Page
Our portfolio is really starting to take shape now that we've completed designing a new banner and inserting it into the header. Our next step is to insert and style content for each of our pages.
We will start with the resume page because it contains several tags/elements we will be using across all of our pages. When inserting content from another source, such as copying and pasting content from a Word document, it's important you understand that this is an imperfect method for inserting content into Dreamweaver. This is due to the fact that Word uses different tags and methods for styling content in a Word document than Dreamweaver, or HTML, does.
What this means for us is we will need to perform some extra steps prior to styling the content so the formatting of our resume page looks clean and professional – just like the Word version!.
Disclaimer: the resume tutorials are based on a generic resume example. You will be using your own resume, so you may need to adjust accordingly – use your noodle, problem solve if you run into problems!
Getting Started
- Open your "resume.docx" document in Word
- Using your cursor, highlight the content of your resume and select File > Copy
- Next, load Dreamweaver
- Double-click "resume.html" in the Files Panel to open the file
Pasting in Dreamweaver
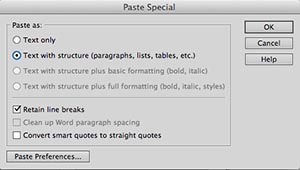
Dreamweaver gives you four (4) different options for pasting copied items into a document. None is a perfect method, but each serves a different function depending on the content you wish to insert. The amount of applied formatting in a Word document will determine which method you choose. Be advised that the 4th option is NOT RECOMMENDED because this method will bring additional styling from Word that is often difficult to change.
- Highlight and delete the text "resume" and any extra spaces so there is only space inside the content <div> tag
- Select File > Paste Special
- The Paste Special dialogue box opens and you see the four options for pasting content
- Text Only – just like it says, this method inserts the text in its raw form, no paragraphs, no bullets, nothing but the text. In some cases, this is actually a good option when you already have the formatting in place in the .html document
- Text with Structure – the best option when you don't have existing formatting in place and you want to maintain the basic format of the copied content. This option doesn't bring in any of the Word styling, allowing you to style the content freely in DW
- Text with Structure plus Basic Formatting – a good option that will bring in some of the basic formatting such as bold and italics
- Text with Structure plus Full Formatting – this method will bring in the fully formatted text from Word; however, this can insert content in unexpected ways and can be difficult to fix in DW – we don't recommend this method – it's better to style the text in DW
- Select "Text with Structure" then click OK
- You should see your resume inserted in the content <div> tag
- Note: we will be styling the content of this page, so if you're wondering why the text doesn't look great, and why the bullets appear to go off the page, we will fix all this in the next tutorial

Next Steps
In the next exercise, we will apply the correct formatting, i.e., tags/elements, to the resume content.
