

Portfolio: Inserting and Styling Content
Styling the Resume
Now the content for the resume is formatted correctly with the right tags/elements, we can style the resume to look more professional and publishable.
Before we jump into styling our first tag/element, let's take a look at the tags/elements we used in the resume document.
Place the cursor in your name, and check out the tag structure in the Tag Selector. You should see an <h1> tag at the end of the tag structure like in the image below.

Go through the rest of your resume document in the same way, placing your cursor in each section and noting all the tags/elements we used. You should have a similar list of tags/elements below:
- <h1>
- <h2>
- <p>
- <ul>
- <li>
- <a>
- <table>
- <tr>
- <td>
Important note: the styling we apply to these tags, such as, the <h1> (heading 1), <h2> (heading 2), <p> (paragraph), and so on, will also have the EXACT SAME styling for these tags/elements on the rest of our pages. In styling these tags/elements, format them so they will look professional for a number of purposes.
Styling the <h1> Tag
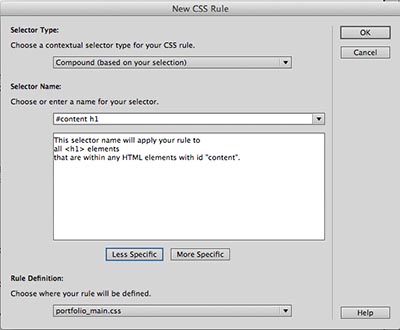
- Place the cursor in your name, then click the <h1> tag in the Tag Selector so it appears bubbled and highlights your name
- Click the New CSS Rule Button
- The New CSS Rule dialogue box opens
- Click the Less Specific button one (1) time so the selector name reads like the image below
- Click OK
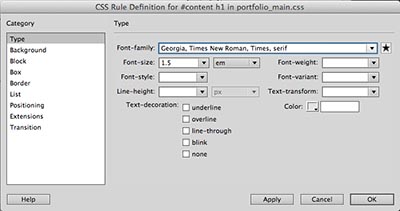
- The CSS Rule Definition for #content h1 dialogue box opens
- With the Type category selected, change the Font-type to the opposite of what you set for the page default font type. In this case, I set the page default font type to a sans-serif font, so I set the font type for the <h1> tag to Georgia, a serif font type. I will do this for all the heading tags so the font-type is just a little bit different and is set apart from the rest of the body text
- type 1.5 in the Font-size box, then change the value type from pixels (px) to ems (em)
- Note: ems are just another value type for adjusting font size. It's based on a multiplier value, where 1 em is the default font size, so we are multiplying the font size for the <h1> tag by 1.5 times
- Note: I'm going to keep the font styling for the <h1> tag simple so my resume page looks professional and so I can use the <h1> tag in multiple areas of the portfolio
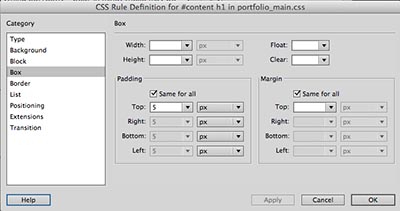
- Select the Box property in the Category column
- For the Padding property, type 5 in the value box for all four sides (leave the check in the "same for all" box) and leave the value type as pixels (px)
- Click OK


Styling the <h2> Tag
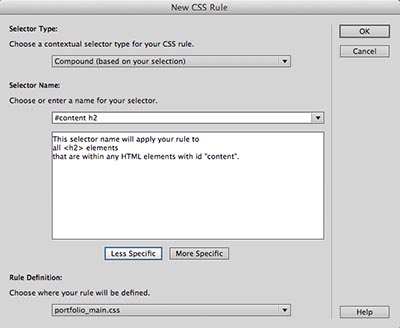
- Place the cursor in the "Profile" heading, then click the <h2> tag in the Tag Selector so it appears bubbled and highlights the "Profile" heading
- Click the New CSS Rule Button
- The New CSS Rule dialogue box opens
- Click the Less Specific button one (1) time so the selector name reads like the image below
- Click OK
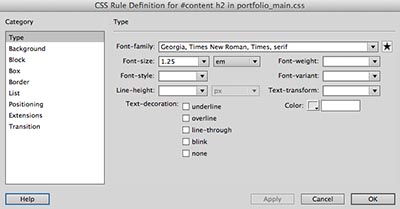
- The CSS Rule Definition for #content h2 dialogue box opens
- With the Type category selected, change the Font-type to the same font-type as the <h1> tag to maintain the font style consistency for headings
- type 1.25 in the Font-size box, then change the value type from pixels (px) to ems (em)
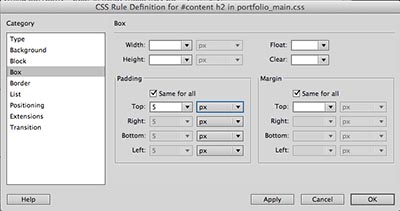
- Select the Box property in the Category column
- For the Padding property, type 5 in the value box for all four sides (leave the check in the "same for all" box) and leave the value type as pixels (px)
- Click OK

Styling the <p> Tag
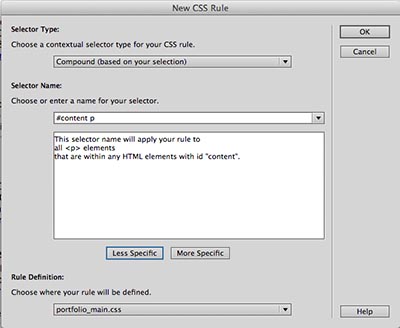
- Place the cursor in your address, then click the <p> tag in the Tag Selector so it appears bubbled and highlights a part of your address
- Click the New CSS Rule Button
- The New CSS Rule dialogue box opens
- Click the Less Specific button one (1) time so the selector name reads like the image below
- Click OK
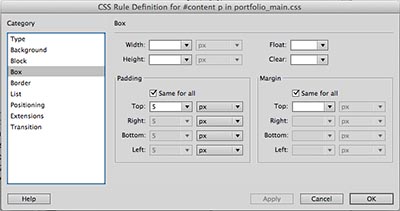
- The CSS Rule Definition for #content p dialogue box opens
- With the Type category selected, Type 1.5 in the "Line-height" box, then change the value type from pixels (px) to ems (em)
- Select the Box property in the Category columnn
- For the Padding property, type 5 in the value box for all four sides (leave the check in the "same for all" box) and leave the value type as pixels (px)
- Click OK


Styling the <ul> Tag
- Place the cursor in one of your Profile bullet points, then click the <ul> tag in the Tag Selector so it appears bubbled and highlights the entire bulletted list of your profile points
- Click the New CSS Rule Button
- The New CSS Rule dialogue box opens
- Click the Less Specific button one (1) time so the selector name reads like the image below
- Click OK
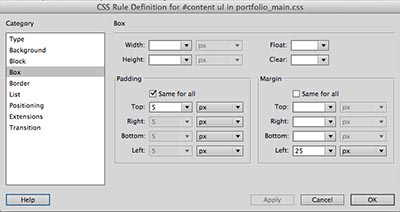
- The CSS Rule Definition for #content ul dialogue box opens
- Select the Box property in the Category columnn
- For the Padding property, type 5 in the value box for all four sides (leave the check in the "same for all" box) and leave the value type as pixels (px)
- For the Margin property, uncheck the "Same for all box", Type 25 in the "Left" box, and leave the value type as pixels (px) – this will space the bullet points out from the left margin to appear indented
- Click OK


Styling the <li> Tag
- Place the cursor in one of your Profile bullet points, then click the <li> tag in the Tag Selector so it appears bubbled and highlights the entire bulletted list of your profile points
- Click the New CSS Rule Button
- The New CSS Rule dialogue box opens
- Click the Less Specific button one (1) time so the selector name reads like the image below
- Click OK
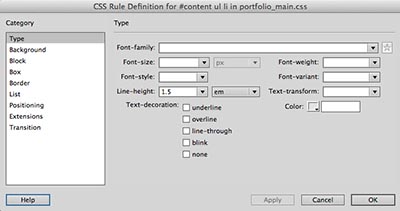
- The CSS Rule Definition for #content li dialogue box opens
- With the Type property selected in the Category column, type 1.5 in the "Line-height" box, then change the value type from pixels (px) to ems (em)
- Click OK


Styling the <a> Tag
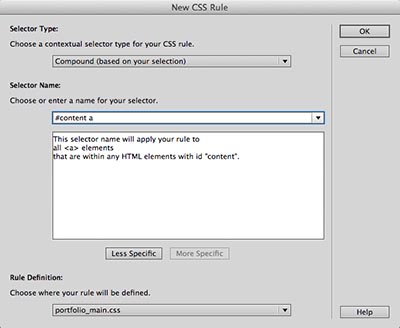
- Place the cursor in your email link, then click the <a> tag in the Tag Selector so it appears bubbled and highlights the entire email link/li>
- Click the New CSS Rule Button
- The New CSS Rule dialogue box opens
- Click the Less Specific button one (1) time, then delete the "p" and the extra space so the selector name reads like the image below
- Click OK
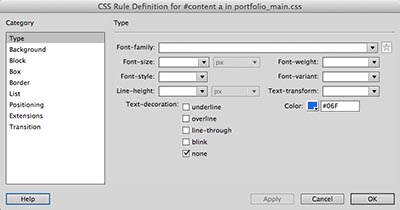
- The CSS Rule Definition for #content a dialogue box opens
- With the Type property selected in the Category column, check "none" under the Text Decoration property – in the next section will add link interactivity by applyin a pseudo-class to this element so the link acts and appears like a link when a user clicks it
- Choose a new font color by clicking the Color Picker box – I recommend you choose a blue color to be consistent with web design standards of using blue for in-text links
- Click OK

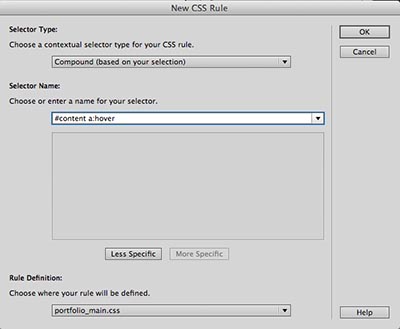
Styling the "Hover" Pseudo-Class to Create Link Interactivity to the <a> Tag
- Place the cursor in your email link, then click the <a> tag in the Tag Selector so it appears bubbled and highlights the entire email link/li>
- Click the New CSS Rule Button
- The New CSS Rule dialogue box opens
- Click the Less Specific button one (1) time, delete the "p" and the extra space, and then add ":hover" so the selector name reads like the image below
- Click OK
- The CSS Rule Definition for #content a:hover dialogue box opens
- With the Type property selected in the Category column, check "underline" under the Text Decoration property – this will underline a link when user hovers their moust over it, creating interactivity and making it clear it's a clickable link
- Click OK
Finishing Up
We're going to leave the <table> and its subsequent nested tags, <tr> and <td>, as they appear; there's really not much we can do in terms of styling these tags without affecting how they look on other pages.
Before moving on to the next exercise, scan through the page to make sure you haven't left anything untouched or fix any other formatting issues that are relevant to your resume.
Next Steps
In the next exercise, we will insert and style content for the home page.
