

Portfolio Design: Publishing Your Portfolio
Using Dreamweaver's Put Feature
So you've finished designing your portfolio and want to publish it to the web. We designed a system to allow you do just that.
Before you "put" your portfolio over to the web, we want to make sure all setttings for the site setup are correct.
If you haven't defined the site for you portfolio, or moved to a different computer, follow the steps outlined in Defiing the Site
Managing the Local Site Setup
- Click site > Manage Sites
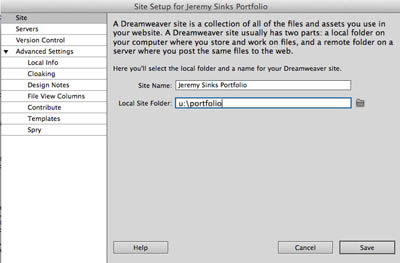
- Verify the settings outlined below
- Check for "your name + portfolio" in the site name box
- Check the file path in the "Local Root Folder" box – you should see "u:\portfolio"
- Next, click the "twirl down" triangle next to "Advanced Settings" in the left column to reveal a list of more options
- Then, select Local Info < li>Check the file path for the "Default Images Folder" box – you should see u:\portfolio\lastname_firstname_portoflio\images
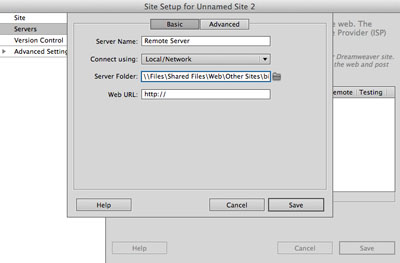
- To verify the server setup, click "Servers" in the left-hand column
- Verify the settings outlined below
- Double-click the name "Remote Server" in the box
- Make sure the Connect Using box is set to "local/network"
- In the File Path box, check for the correct file path for your class
- Click save
Seniors: \\Files\Shared Files\Web\Other Sites\bisstudents.cratercomets.com\student_portfolios\class_of_2013\
Juniors: \\Files\Shared Files\Web\Other Sites\bisstudents.cratercomets.com\student_portfolios\class_of_2014\
Sophomores: \\Files\Shared Files\Web\Other Sites\bisstudents.cratercomets.com\student_portfolios\class_of_2015\
Freshman \\Files\Shared Files\Web\Other Sites\bisstudents.cratercomets.com\student_portfolios\class_of_2016\
Putting Over Your Portfolio
Before you put your site over, make sure you go through your pages one more time to make sure everything is working properly
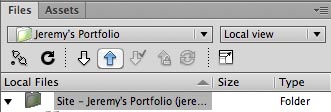
- Select the top folder – the root folder in your Files panel
- click the blue up-arrow above the list of files in the files panel – this will "upload" your site
- A dialogue box opens asking you if you want put your entire site over
- Click OK
Check your Site
We will be putting a link on the BIS Portfolio Page for you portfolio, but in the meantime, if you want to check your site, follow the steps below
- Open a web browser
- In the URL bar, type the following – add appropriate characters for your portfolo: http://bisstudents.cratercomets.com/class_of_201?/lastname_firstname_portfolio/"
- For example: http://bisstudents.cratercomets.com/student_portfolios/class_of_2013/Martin_Anthony_portfolio/
- If you get an error from the browser, this means you typed something in wrong or didn't put your portfolio over correctly – you will need to trouble shoot the problem
Updating and Putting Select Files on the Web Server
If you have updated a page in any way, you will need to put that file over on the web server for those changes to appear on the web.
- Select the file(s) you wish to put over
- You can select multiple files by holding the shift key and clicking the mouse, or holding the ctrl key and clicking on a file
- Click the blue up-arrow in the Files panel
- You may see a dialogue box open that says "Should dependent files be included in the transfer?"
- Click Yes
